What can you expect when you decide to install a radon
reduction system?
Work
is usually completed in one day, with only some projects taking longer.
Before our arrival, ensure the work area is clear and safely
accessible. Be sure to follow any instructions regarding building
conditions for radon measurement or thermal imaging. We'll inspect the
building to determine possible routes for the radon system and work
with the homeowner or person in charge to choose the best option. This
may be done during an earlier estimate or on the day of install just
before starting work. A post-install radon test is arranged unless the
customer wishes to handle it independently.
Radon
is reduced using a technique called Active Soil Depressurization (ASD).
Our pipe sucks air and other soil gases from below the lowest-level
slab then vents them at an appropriate height, preventing them to enter
the building envelope. The system is a permanent fixture to the home,
not a temporary measure. Because radon is always rising from the earth,
the vent and fan are always needed to extract it.
A
simple system with one suction point, one fan, and one vent pipe is
enough for most single-family houses. Some older homes, homes with
multiple slabs, and large buildings may need more complex systems or
multiple systems.
We guarantee an
average long-term radon level below 4 pCi/l (picocuries per liter of
air) with our ASD systems.
These
are the components of a radon system.
|
|
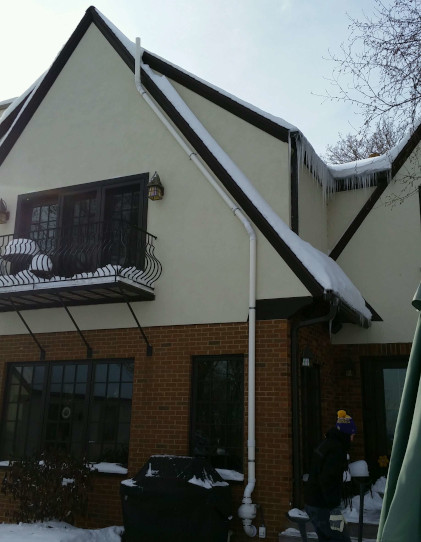
Exhaust
The
exhaust of a radon vent is 3 to 6 inches in diameter yet contains all
the soil gases it extracts from under the building - an extreme
concentration that can be dangerous if the vent is in the wrong
location. We always follow standards so our systems improve building
safety, not compromise it. Proper exhaust location is one constraint
determining where we can install the system.
Always exhasuting outside the building and at least 10 feet
above the ground, we must also keep the proper distance from intakes or
opening windows - at least 10 feet horizontally or 2 feet vertically.
(Any
device that vents soil gases is also venting radon and therefore must
comply with radon standards, even if it's not called a radon system or
intended to be one. For example, vapor intrusion and moisture reduction
systems).
If you have a radon vent that does not meet standards
(knee-level, directly below a window that can open, etc), please call
us to have it recitified!
|
|
|
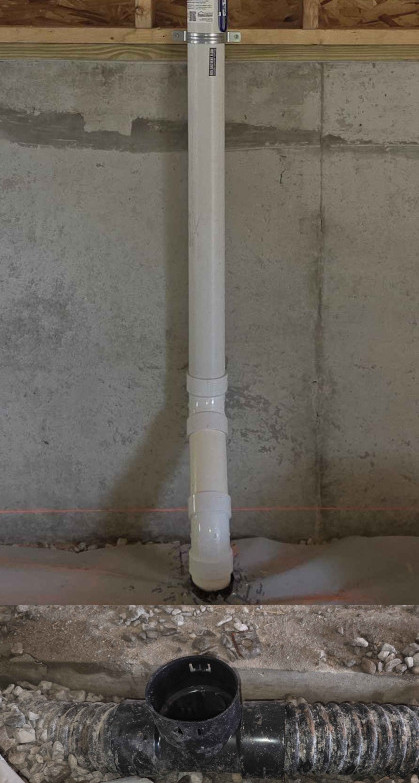
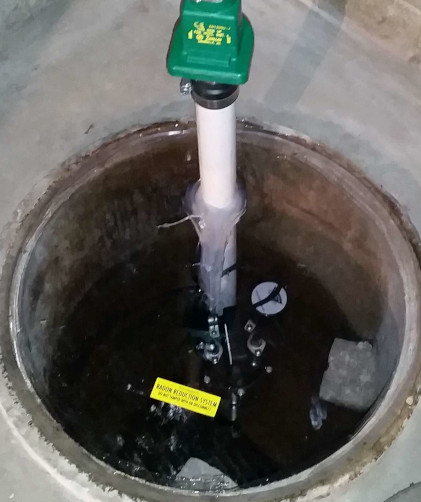
Suction point
Choosing
the right location(s) to draw soil gases from is part of the art and
science of radon installation. Some buildings are very flexible in this
regard, especially those with gravel and drain tile under the slab;
others with dense soil or sub-slab obstructions have specific
requirements.
The U-tube manometer is installed on the
pipe indoors; check this to ensure your system is working.
|
|
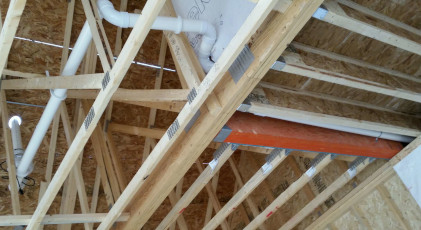
Pipe
The
suction point connects to the exhaust through a continuous pipe. We
strive to find a route that is effective, meets standards, and is
unobtrusive - from below the slab to the vent height and every level in
between. Occasionally this is a challenge when retrofitting a finished
home or squeezing into a new build where radon wasn't planned for.
We use PVC schedule 40 which has waterproof, airtight joints and
is very durable.
Some radon pipes do not have fans. These are called passive
systems. They are often installed during construction - check if your
house already has one! Sometimes they can reduce the radon on their
own; often they need a fan installed to boost effectiveness.
|
|
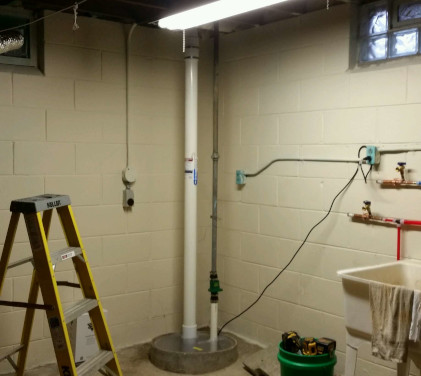
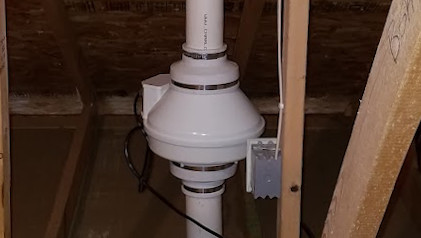
Fan
Applies pressure to the suction pipe so the soil gases flow into the
pipe rather than into your building space.
Must not be installed inside the living space or crawl spaces
below it. Garages, attics, and the exterior are acceptable locations.
Why? Systems have a "vent side" above fan, which pushes air out,
and a "suction side" below the fan which sucks air in. If the piping in
your house were to somehow leak, it would only suck air in rather than
spewing radon out because that part of the pipe is suction side.
There is
an electrical disconnect such as a switch or socket within 6 feet of
the fan.
|
|
Sealed
sump lid
Any
sump pits must
be airtight
for radon systems to work properly, even systems that are not directly
connected to the sump pit. An unsealed pit would be the single biggest
air leak that makes a radon system ineffective. It would cause such
pressure loss that the system can not do its job. (Imagine trying to
drink soda out of a straw with a big hole in between your mouth and the
can).
Bolt-down gasket type lids are common.
If needed, we custom make clear plastic
lids cut to fit your existing sump system then seal the edges with
silicone sealant. These are removed by
cutting the silicone, but stay reliably airtight until then, while
still allowing you to see inside.
|
|
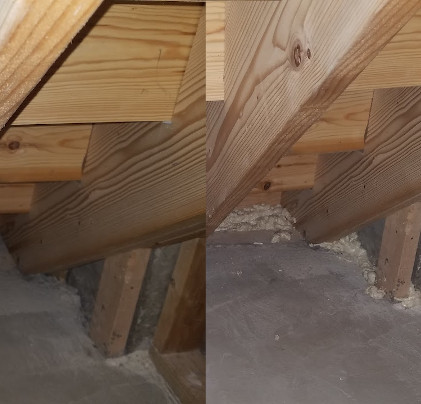
Slab
The slab itself is an important component. It acts as a barrier
separating air above it from soil gases below it. A tight, leak-free
slab maintains presure under the building while preventing any
backdrafting of air inside the building envelope.
Sometimes leaks must be sealed as part of radon installation.
After installation, any new leaks should be taken care of too.
Common leaks include gaps between the slab and foundation wall,
floor cracks, perimieter drains, anywhere with exposed soil such as
shower boxes, and anywhere wood goes into the concrete.
A large area with no slab, such as some crawl spaces, sometimes
needs sealed plastic sheeting installed to apply a suction point or
prevent leaks.
In this example, the concrete was not fully poured around the
stairs and the leak was big enough that the radon system didn't
function until it was sealed.
|
|
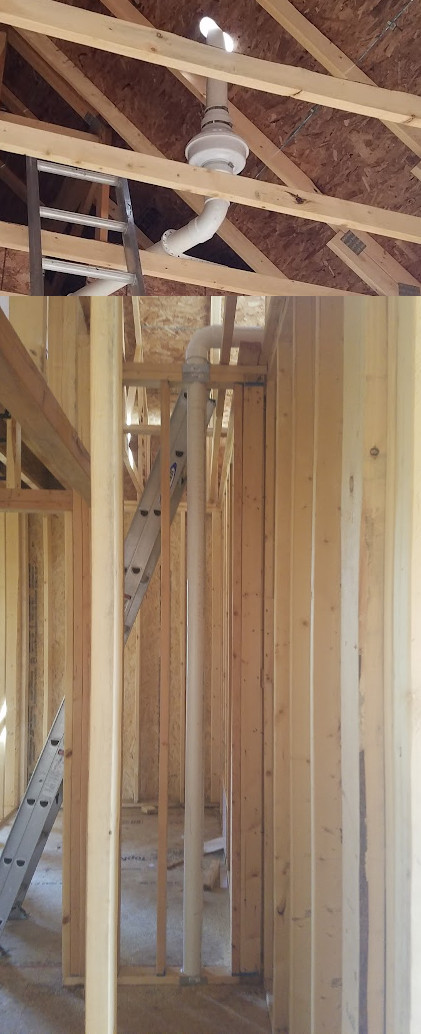
For
new construction and major renovations
Take the opportunity to work with us for the most effective,
inconspicuous, and economical way to make your project radon-safe. Much
of the piping can be hidden inside walls. The existing drainage system
can often be used or modified to get excellent airflow and quiet,
reliable operation. In new construction, even the attic access can be
placed for easy service that won't distrub insulation. Any potential
leaks or blockages to airflow are best dealt with before the slab is
poured.
Rough-ins should ideally be scheduled after framing is done but
before the roof is shingled, slab is poured, or drywall installed.
Floor plans and other necessary information should be provided before
day of installation. With good scheduling and the right information, we
can do a great job with minimal delay or inconvenience.
|
 |
|